

If your lifts ran on peak days with less than two stops an hour and no missed chairs, T-sticks, platters or J-bars for 15 minutes, then you can believe that the loading and unloading areas of your lifts are in pretty good shape. But if operations were plagued with frequent stops and missed carriers, it is quite possible that some summer revamping of these critical lift areas may make things easier on both attendants and lift equipment next year, adding uphill capacity to the ski area as well.
Loading areas
The critical point of all loading operations is the place where skiers wait to move into the loading area. Three rules apply to this area: 1) It must be sufficiently flat so that skiers do not have to use poles to keep from sliding into or climb up the loading area; 2) It must be near the loading position so that skiers can move there quickly; 3) The skier should face in the general direction of lift travel so he will not have to make sharp turns which might cause crossed skis or falls.
Behind the position area things gradually become less important. While precise timing is required to move into the loading area from the position area, movement in the waiting lines is more gradual. However, it is important that the area immediately behind the position area be kept relatively flat so that succeeding skiers can move to the position area without riding the tails of the skiers ahead or being required to climb to position.
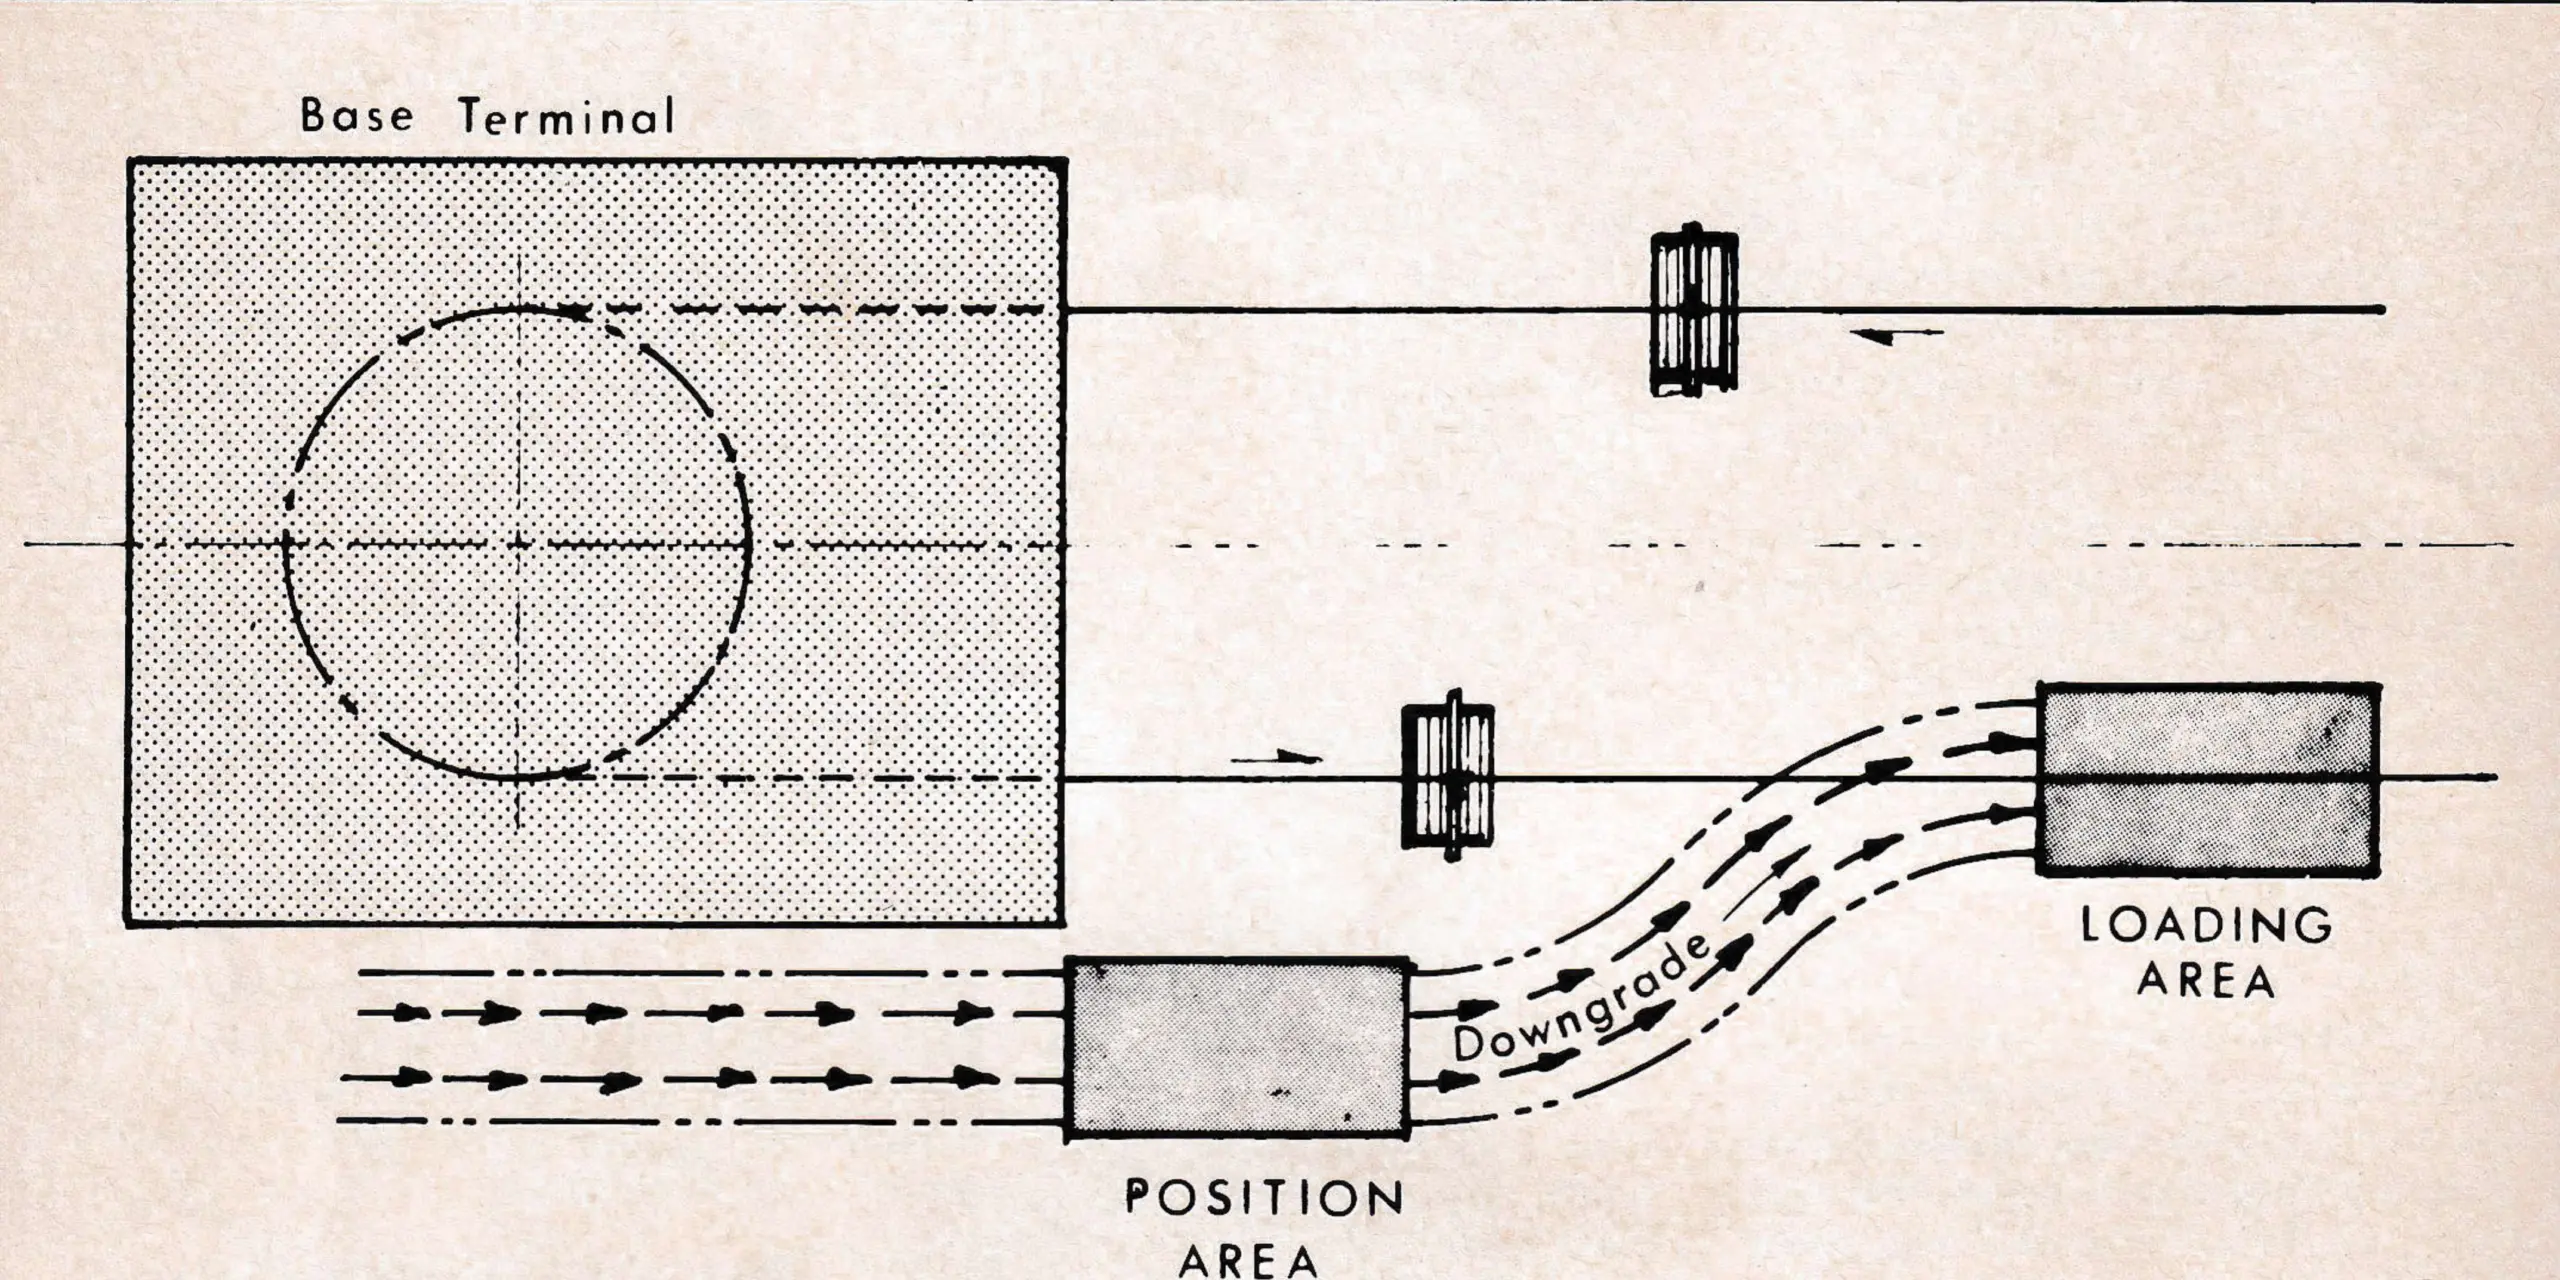
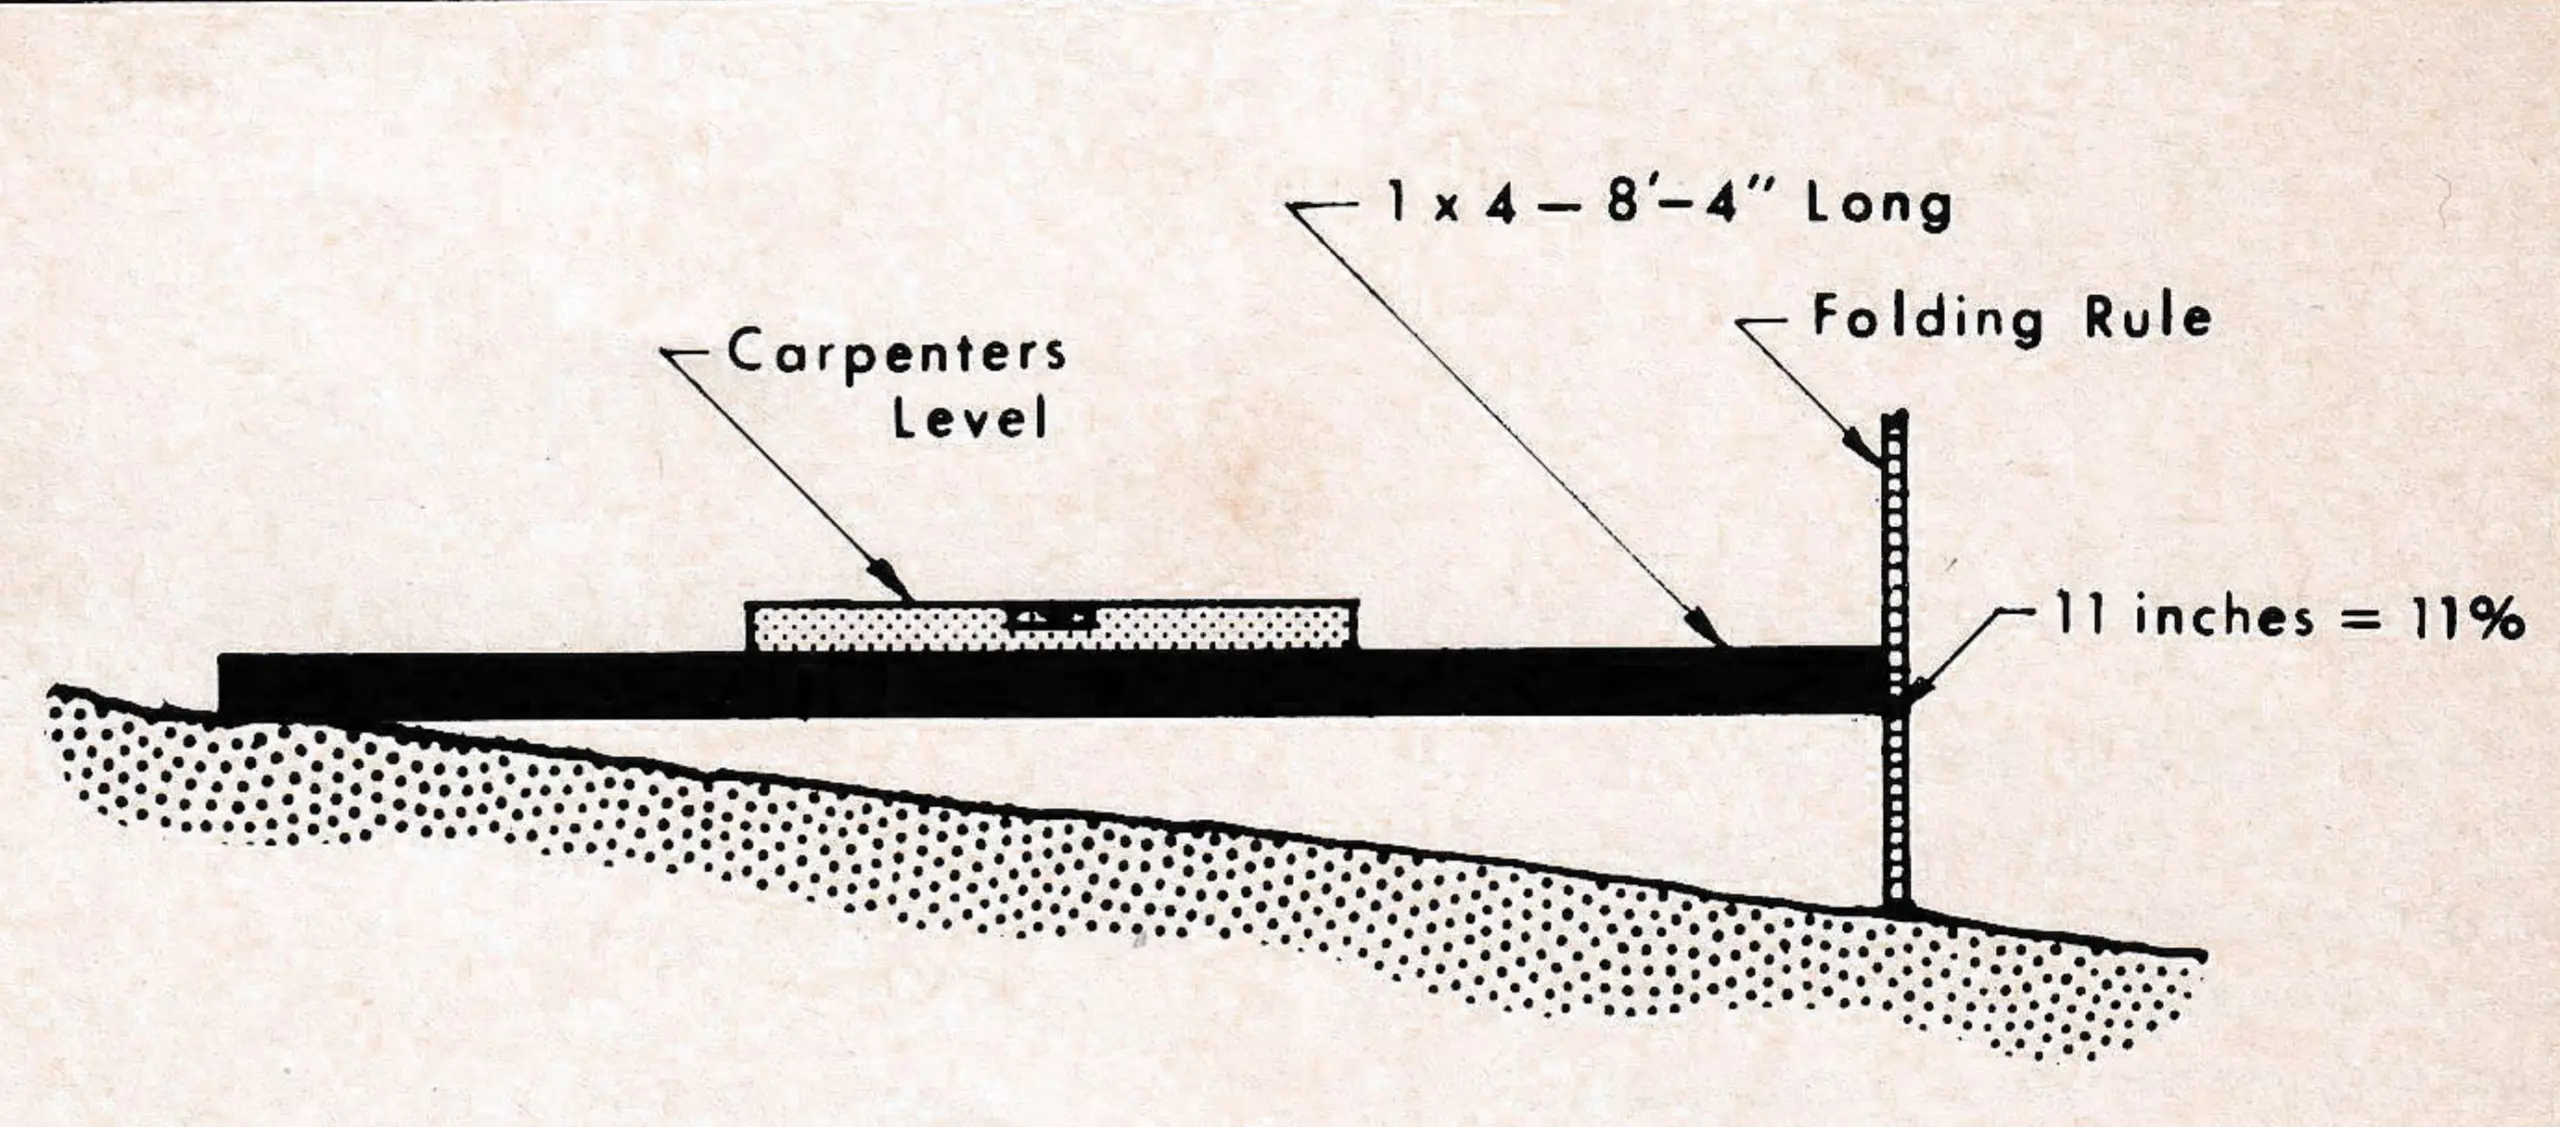
Movement of the skiers from the position area to the loading area is most important. For conventional loading arrangements, this movement should be a short downgrade shallow reverse turn. Figure 1 shows the typical arrangement. It is important that the grade not be so steep as to cause skiers to slide beyond the loading area. A downgrade range from 5 to 8 per cent is ideal. To check this, a simple grade-measuring device can be made by taking a straight piece of 1×4-inch wood and cutting it to 8 feet 4 inches long. Place a carpenter’s level on this piece and level it. Then measure the height of the ground below the one end. This distance, in inches, is the average grade between the two ends. (See Figure 2.)
The best position of the loading area varies not only for different types and makes of lifts, but even between lifts of the same type and manufacturer. If you have not had a couple of seasons’ experience with the location of the loading area, don’t get too elaborate with arrangement of a final loading configuration. One fixed rule can be given—make sure that the skiers are positioned under the haul rope when loading. Side swing in chairs and falls on surface lifts are frequently caused by skiers being offset to the side when loading. A second rule applies to surface lifts–don’t try to make skiers load on an upgrade. And a general rule for chairlifts is don’t try to load in the middle of a span–load near a tower where the chair height is less affected by rope sag and movement.

If a lift is located where the general base area has little cross slope, the preceding recommendations for shaping the loading area will lead always to a wet loading area. Here is an area where it doesn’t pay to skimp. Provide adequate and reliable drainage from the loading area. For chairlifts and some surface lifts, the permissible snow build-up at the loading area should be limited to a matter of inches. Accumulated snowfalls will make this loading pocket even deeper. Culverts out of this area should never be less than 8 inches in diameter, and water bars should be placed and maintained just uphill of the loading area to prevent drain-off from reaching the area.
There are several factors to consider when grading the loading area. For chairlifts, the chair seat should be 12 to 16 inches above the loading surface. If the lift has heavy usage by children, favor the 12-inch height. If it is a faster lift serving more difficult terrain, favor the 16-inch height. Remember, heights cause more excessive fore and aft swing than any other single factor. Surface lifts are less critical, but telescopic T-bars and fixed length J-bars should not be too low when they pass the loading area. Twelve inches is a good minimum height.
Beyond the loading area
The next crucial phase of lift loading occurs after the skier and carrier have met at the loading area. For surface lifts, as stated previously, this area should be nearly level to permit the skier to accelerate to lift speed before encountering an appreciable upgrade. Make the change in grade from loading to uphill travel gradual. On surface lifts, if a cut is required to achieve this gradual change in grade, make it wide enough so that when a skier falls in this area he can step aside and clear the lift line.
Two basic configurations can be used for chairlifts. Under the first, a pronounced loading platform is provided so that as soon as the skiers are seated they are “picked” free of the snow surface. If the lift breaks upwards sharply, this arrangement usually works out quite well. It is important that the region 15 to 35 feet ahead of the loading area be sufficiently low so that ski tips do not become caught in the snow. Nearly all chairs require about three seconds to make one full fore and aft swing. In this period of time the lift travels 17