


Of the four most common non-destructive testing methods (liquid penetrant, magnetic particle, ultrasonics, and radiography), the “liquid penetrant” method is the most basic and least expensive. A typical three-part “kit” can be obtained for roughly $25 from automotive supply houses. Brand names such as “Spot Check” by Magnaflux and “Dubl-Check” by Sherwin are fairly well-known.
The objective of liquid penetrant testing is the detection of surface imperfections in welds, castings, and machined shapes in a rapid and economic manner. It is also required to satisfy a need for the testing of non-magnetic materials such as aluminum, some stainless steels, and magnesium.
History and Development
Actual penetrant testing began in the late 1900’s in the railroad industry. Technicians used thinned down spent lubricating oil as a “penetrant” and a chalk/alcohol mixture for “developing.” Any imperfections showed up as dark stains on a white background.
Other noteworthy developments are as follows:
- 1938: Experiments were conducted using colored dyes in penetrants — increase contrast (Red).
- 1941: Fluorescent dyes introduced with ultraviolet light — superior contrast using yellow-green. Penetrant oil containing emulsifier was developed — water washable.
- 1957: More sensitive but separate penetrant and emulsifier developed which added an extra step.
- Recent: Previous combined emulsifier/penetrant is now as sensitive as the extra step process.
Procedure
Just what is “liquid penetrant” and how is it used? Very simply, a very thin penetrating oil is applied to an area where discontinuities or flaws are expected. Due to capillary action, the oil penetrates all but the tightest cracks in a non-porous surface. Thus, when a “developer” is applied over the same area, any cracks are indicated by fine lines, usually red, against the white background of the developer.
The proper procedure for this type of testing is as follows:
- Pre-clean and dry surface to be examined (fig. 1).
- Apply penetrant and allow recommended time for capillary action to draw penetrant into discontinuities (fig. 2).
- Remove excess penetrant by wiping or washing (with application of emulsifier first) and dry surface thoroughly by wiping or use of oven (not too hot) (fig. 3).
- Apply developer (dry or wet type) to draw penetrant back up to surface (fig. 4).
- Inspect material for discontinuities (flaws) and determine whether they are defects and thus cause for rejection (fig. 5).
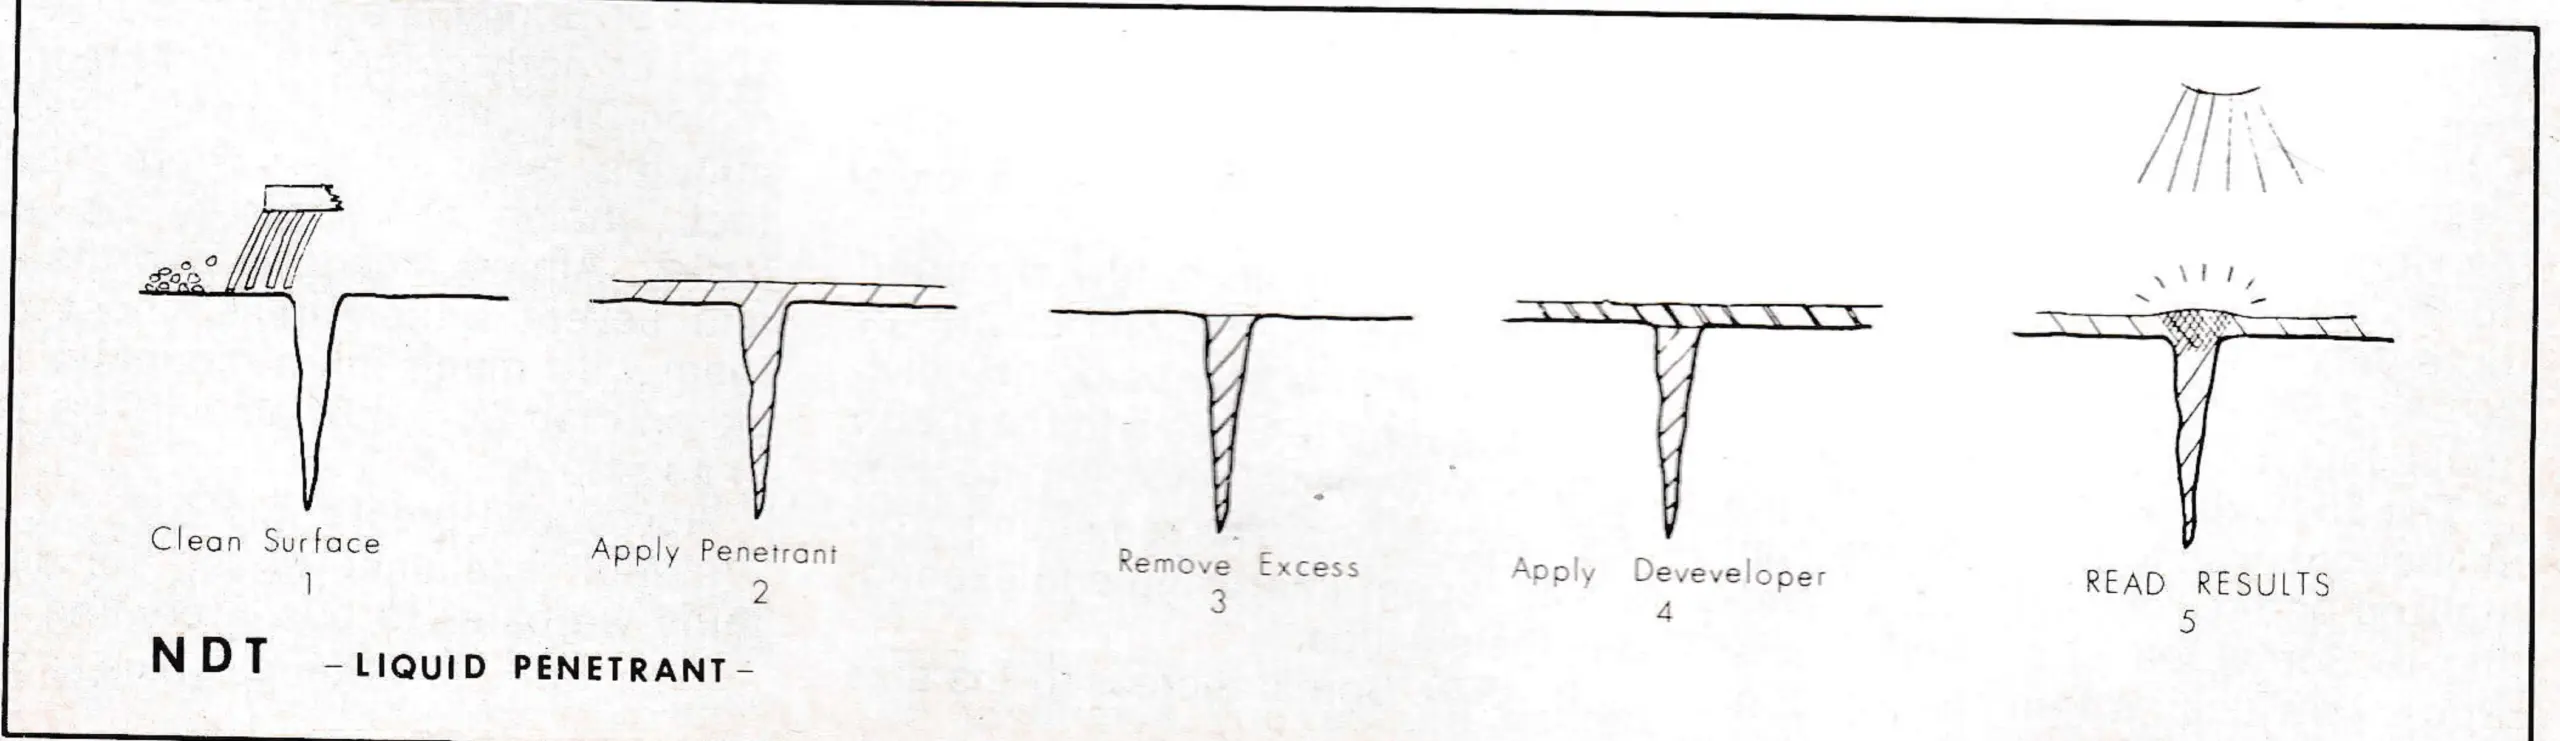
There are, however, limited uses of LPT at ski areas due to parts cleaning problems. Just a few are: checking weldments in chair bails and restraint bars (before painting), and checking grips for cracks and detecting cracks in gear housings.

Before discussing LPT with anyone “in-the-know,” you should master these three simple terms:
- Discontinuity (flaw): an interruption in the normal physical structure of the piece.
- Indication:(LPT) indicates the presence of a flaw.
- Defect: flaw that interferes with usefulness of product.
Testing Materials
Regardless of trade name, the various types of materials available for testing generally apply to all LPT procedures. Cleaners are essentially two types: emulsifiers and solvents. The emulsifiers act as a compatibility catalyst allowing water to mix with oil and thus remove oil or excess penetrant through washing. Solvents are simply non-water type cleaners not unlike those used to degrease your grips or auxilliary engines. Either is applied after paint, rust, and dirt are removed. Penetrants come in three classes: (a) built-in emulsifier (b) add-on emulsifier (c) hand wipe. In addition, with fluorescent types, there are three levels of sensitivity: (1) regular (2) high (3) ultra high. Developers come in dye penetrant inspection kits and usually come in four types: (1) a dry powder which is applied after all surface moisture is removed (2) a wet developer which is used either before or after drying (3) a solvent based type usually employed with non-fluorescent penetrants on dry materials (4) the less popular film type.
As with any process, there are always limitations, even with this simple test and inspection technique: (1) internal flaws or discontinuities cannot be detected since the flaw must not only reach the surface, but also not be so tight that the penetrant can’t enter. Mechanical or thermal stressing may be used to assist in opening the cracks (2) unfortunately, penetrants are somewhat sensitive to cold temperatures suggesting that whenever possible, parts to be tested should be brought into the shop in winter (3) the duration of penetrant application is important in that insufficient time allowance prior to wiping may prevent penetrant from reaching far enough into cracks to allow later detection (4) conversely, excessively long waits allow the penetrant to dry out and thus cause incomplete developing (5) excessive drying temperature will adversely affect visibility of fluorescent type dyes (6) insufficient dwell time of the developing powder won’t allow penetrant to be drawn to the surface, while excessive time will allow the absorbed penetrant to spread out making analysis difficult (7) if machined parts to be inspected contain various small holes or cavities, excess penetrant will bleed from these points into the area in question and produce a very poor background (8) surface cleaning and preparation can close the actual flaws that you are checking for; also, paint can be drawn into the crack preventing future indications when using liquid penetrants (8) when you feel confident that your materials, procedures, and employee training are up to par, it wouldn’t hurt to make sure the employees involved aren’t color blind.
For more information on all phases of NDT, contact any one of our NDT advertisers or write: The American Society for N.D.T., 914 Chicago Avenue, Evanston, Ill. 60202.