

Why, you might ask, is a belt drive called a transmission in the first place? Let’s look at the word transmit. It means “to transfer from one place to another.” Thus, in the case of belt-type transmissions, power is transmitted from one place (an electric motor, for example) to another (a shaft or gearbox). Power can also be transmitted by other means, such as a bicycle chain, leather belt, nylon gears jack shaft or hydraulic pump. You can even find single or double belt transmissions powering older-style dentist drills. Ouch!
There are other types of transmissions that ski area personnel are more familiar with. One consists of the closed units, such as manual and automatic gear or fluid drives found in pick-em up trucks and groomers. Another closed type that is more familiar to lift mechanics is the ordinary skilift gearbox. Beside the normal reductions within the two- or three-stage boxes such as Kissling and Western types, there is almost always an angle or direction change of the input power. The same is true for open gear drives found on older chairlifts and T-bars. Open gear drives are usually one-stage reduction, comprised of a small pinion gear and a large bull gear. They tend to be noisy and don’t smell very good—the lube, that is.
Getting back to belt drives, in this article we will deal exclusively with V-shaped belts, leaving cog-type and serpentine (newer cars and trucks) for others to address. There are at least four classes of V-belts: a. Standard or “classical”; b. Narrow—3V, 5V and 8V; c. FHP fractional horsepower; and d. Synchronous cog-type belts. Of the various V-section belts available, this article will be limited to the narrow and classical series.
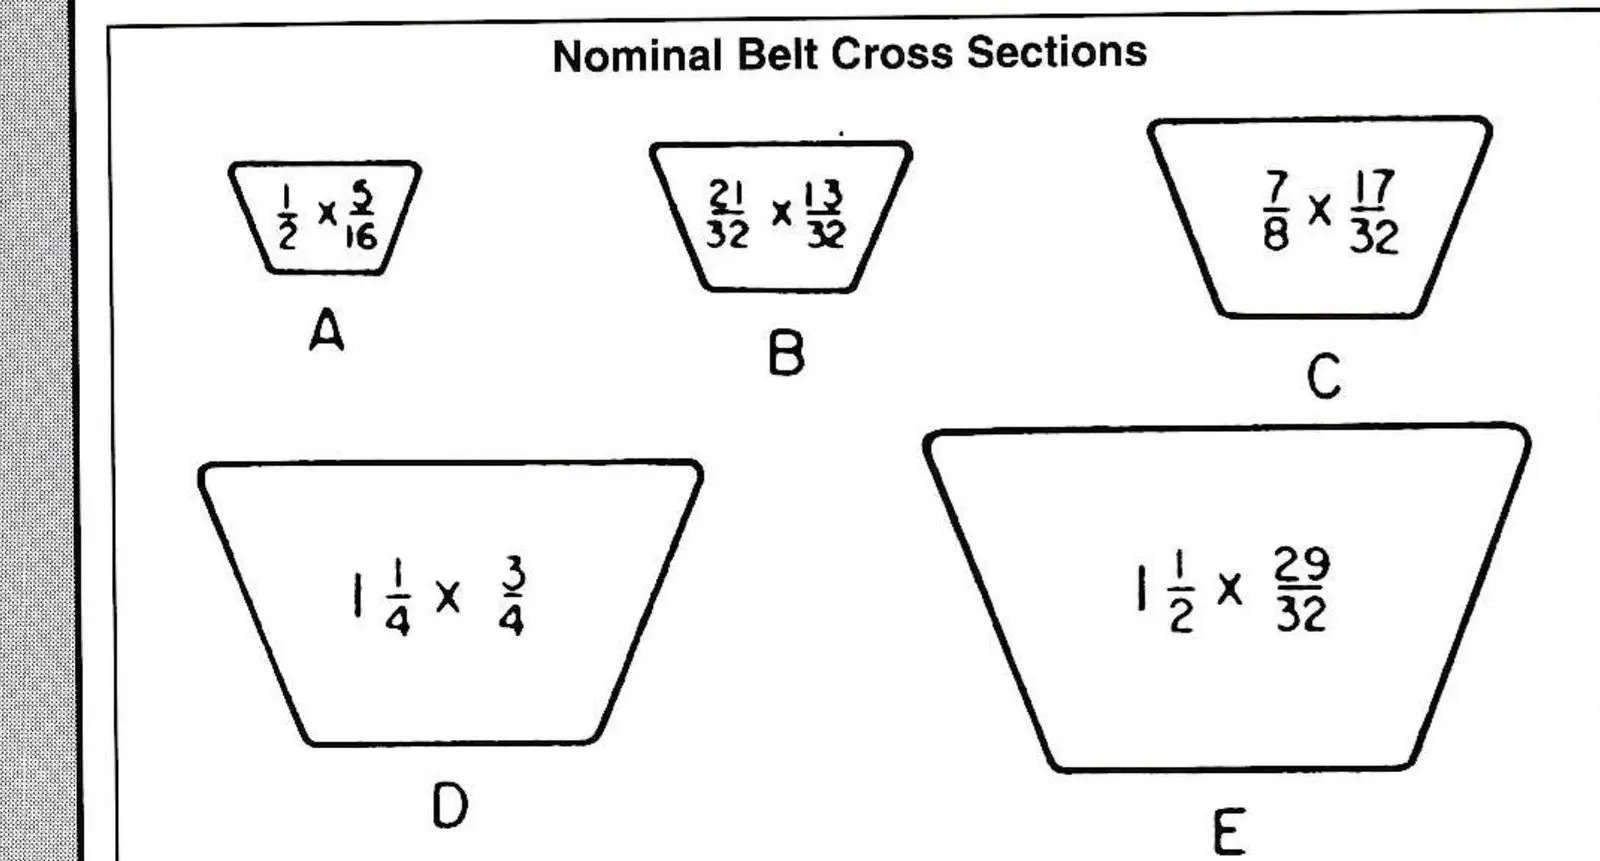
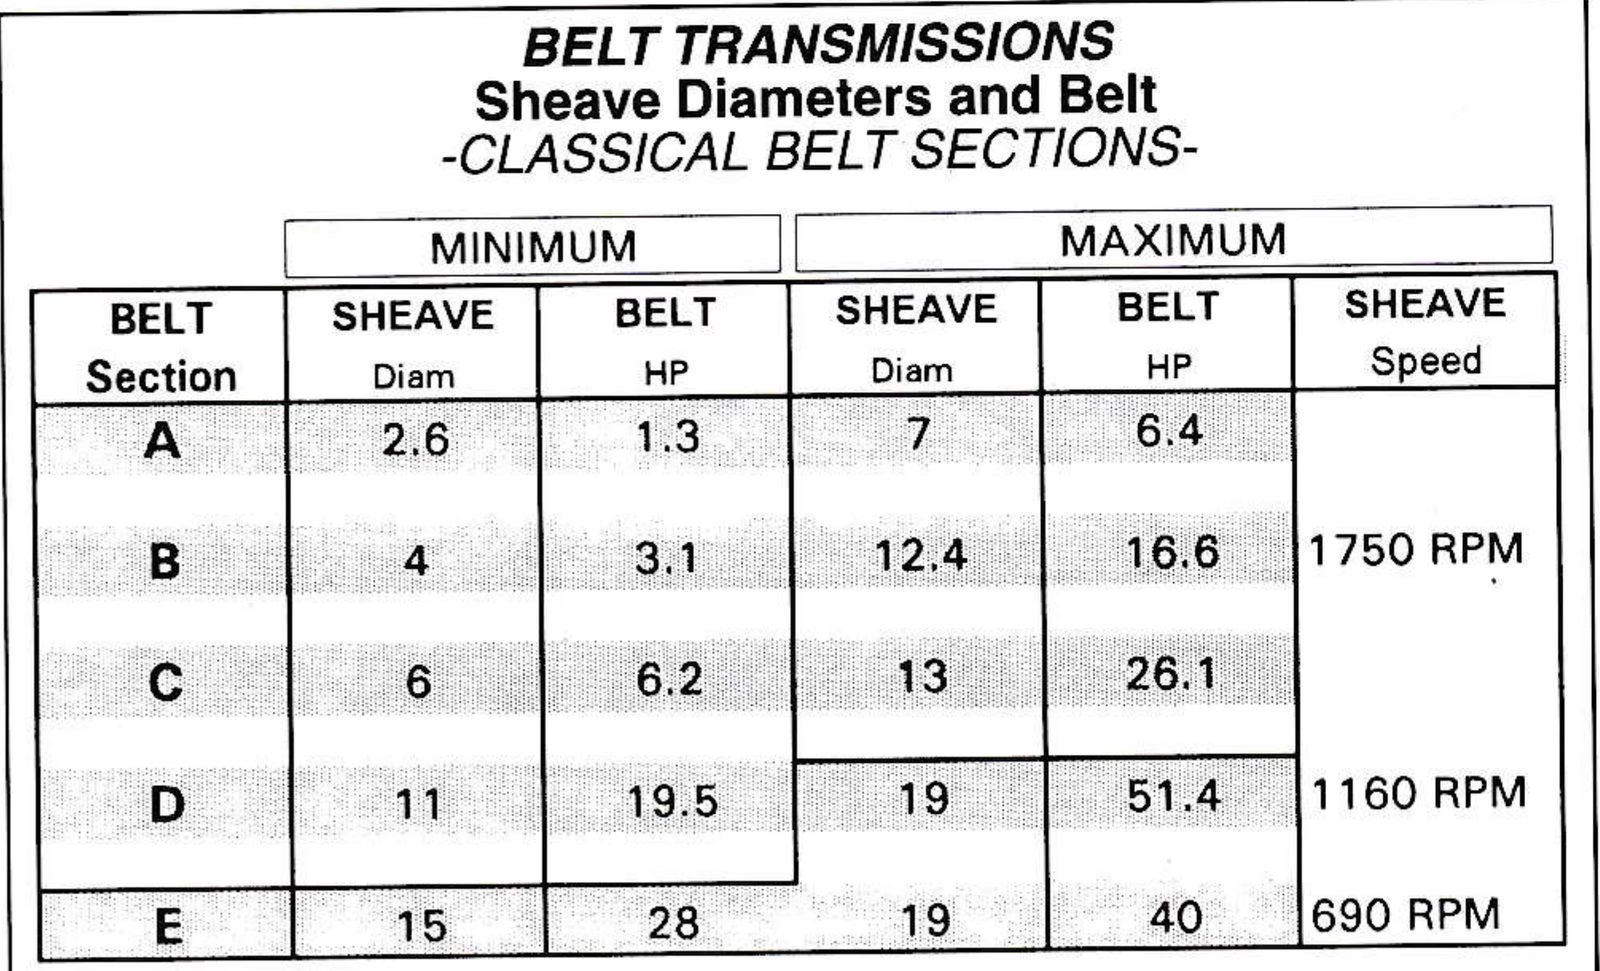
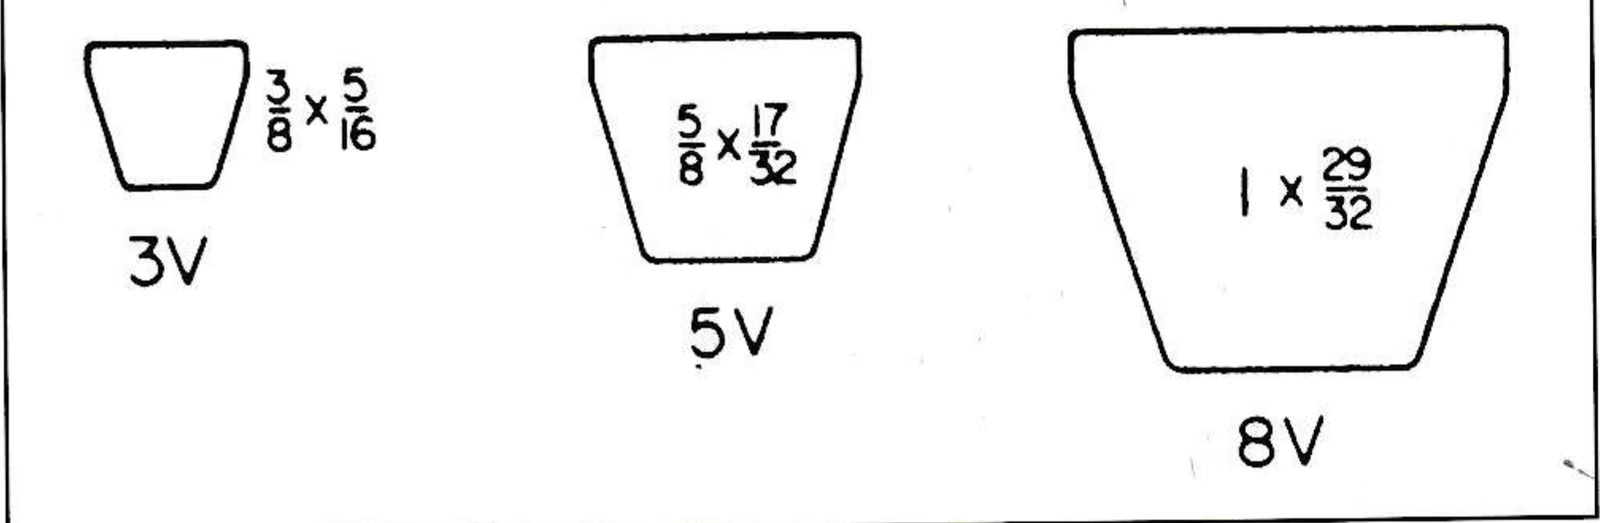
Within the classical series there are five standard sizes. Each is designated by a letter, beginning with A for the smallest and ending with E for the largest. (See Figure #1 for typical dimensions.) The A belt has the smallest cross-section and is limited to lower horsepower applications. One benefit offered by the A-size belts is being able to use smaller, less expensive drive sheaves—down to about 2-1/2 inches in diameter. Figure #2 lists the practical upper and lower limits of horsepower and drive sheave size. Note that the allowable rpm decreases as the drive sheave diameter increases. Whenever possible, the narrow series of belts are used when designing skilifts in order to reduce the sheave width and subsequently the amount of overhang loading on both the motor and gearbox. There are three narrow sizes: 3V, 5V and 8V. (See Figure #3.) In case you didn’t notice, these belt designations are similar to those used for reinforcing steel (rebar). The 3, 5 and 8 are the number of eighths in width of the crown of the belt.
V-belts are most commonly offered in natural or synthetic rubber that is reinforced with various types of fabric or steel, and usually embedded near the top surface of the belt. The tapered V cross-section and lack of pointed end causes the belt to wedge into the sheave groove as load is applied—up to a point. Only the sides of the belt contact the sheave groove and are thus responsible for transferring the applied load through the friction. That is why belts have to be tensioned properly if they are to deliver full horsepower and not slip or squeal.
Let’s get started on actual belt selection for the following skilifts application:
- Installed motor horsepower 100
- Normal hours per day 8
- Sheaves center-to-center distance 38″
- Drive ratio ?
- Service factor ?
Obtaining the motor horsepower is as simple as reading the nameplate information attached to the motor—after removing three layers of paint. Normal operating hours for this lift are from 8:30 to 4:30. The center-to-center distance is from the center of the driver sheave on the motor shaft to the center of the driven sheave on the gearbox shaft. A service factor is usually applied to the motor horsepower. This number increases the required belt horsepower to allow for variations in operating conditions, from light-duty, intermittent fans and small pumps to heavy-duty, continuously operating rock crushers. Within the normal range of factors (1.0 to 1.8), we will use 1.2, based on horsepower, torque characteristics and number of operating hours per day. Thus, the design horsepower equals 1.2 X 100 or 120 hp.
The principles we discussed for selecting gear ratios are the same ones for selecting belt ratios. For example, our lift has the following characteristics:
- Rope Speed: 450 rpm
- B/W Diameter: 12 feet
- Gear Box Ratio: 60:1 (2-stage)
- Motor RPM: 1,750
We need to determine what the high-speed shaft (gearbox input) rpm is before we can choose the proper size of sheaves. The calculation is as follows: Divide the rope speed by the bullwheel circumference and find the BW rpm = 450/(12 X 3.14) =11.94. You know the gearbox ratio is 60:1, so the high-speed shaft rpm must be 60 X 11.94 or 716 rpm. Assuming the electric prime mover runs at 1,750 rpm, then a speed reduction of 1,750/716 is required, or 2.44. Piece of cake.
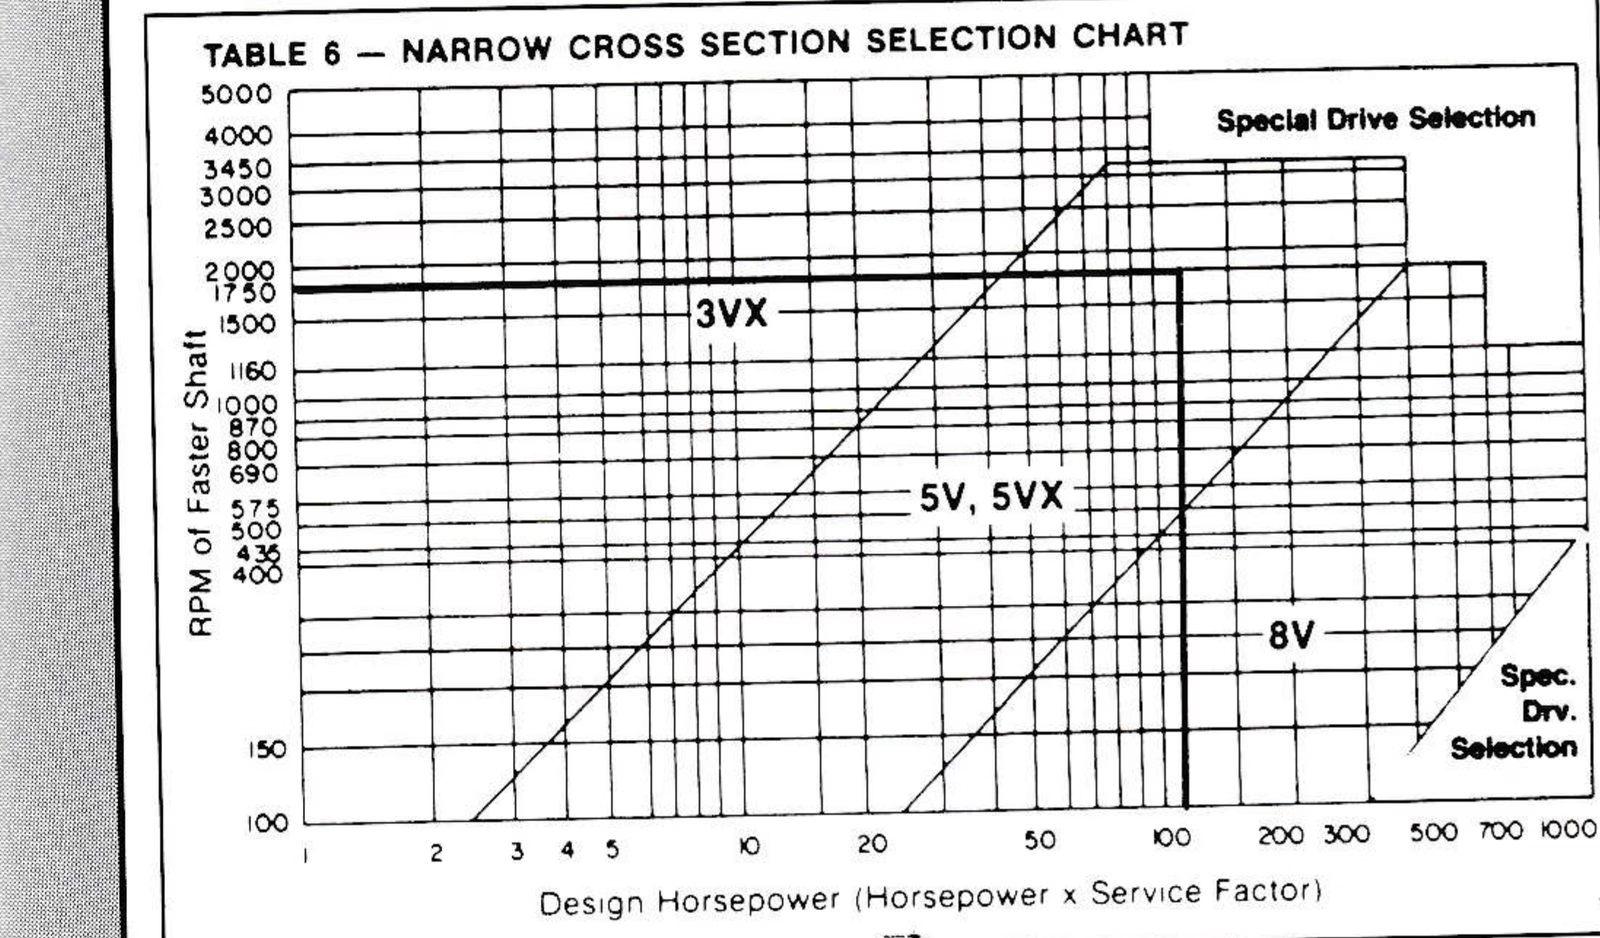
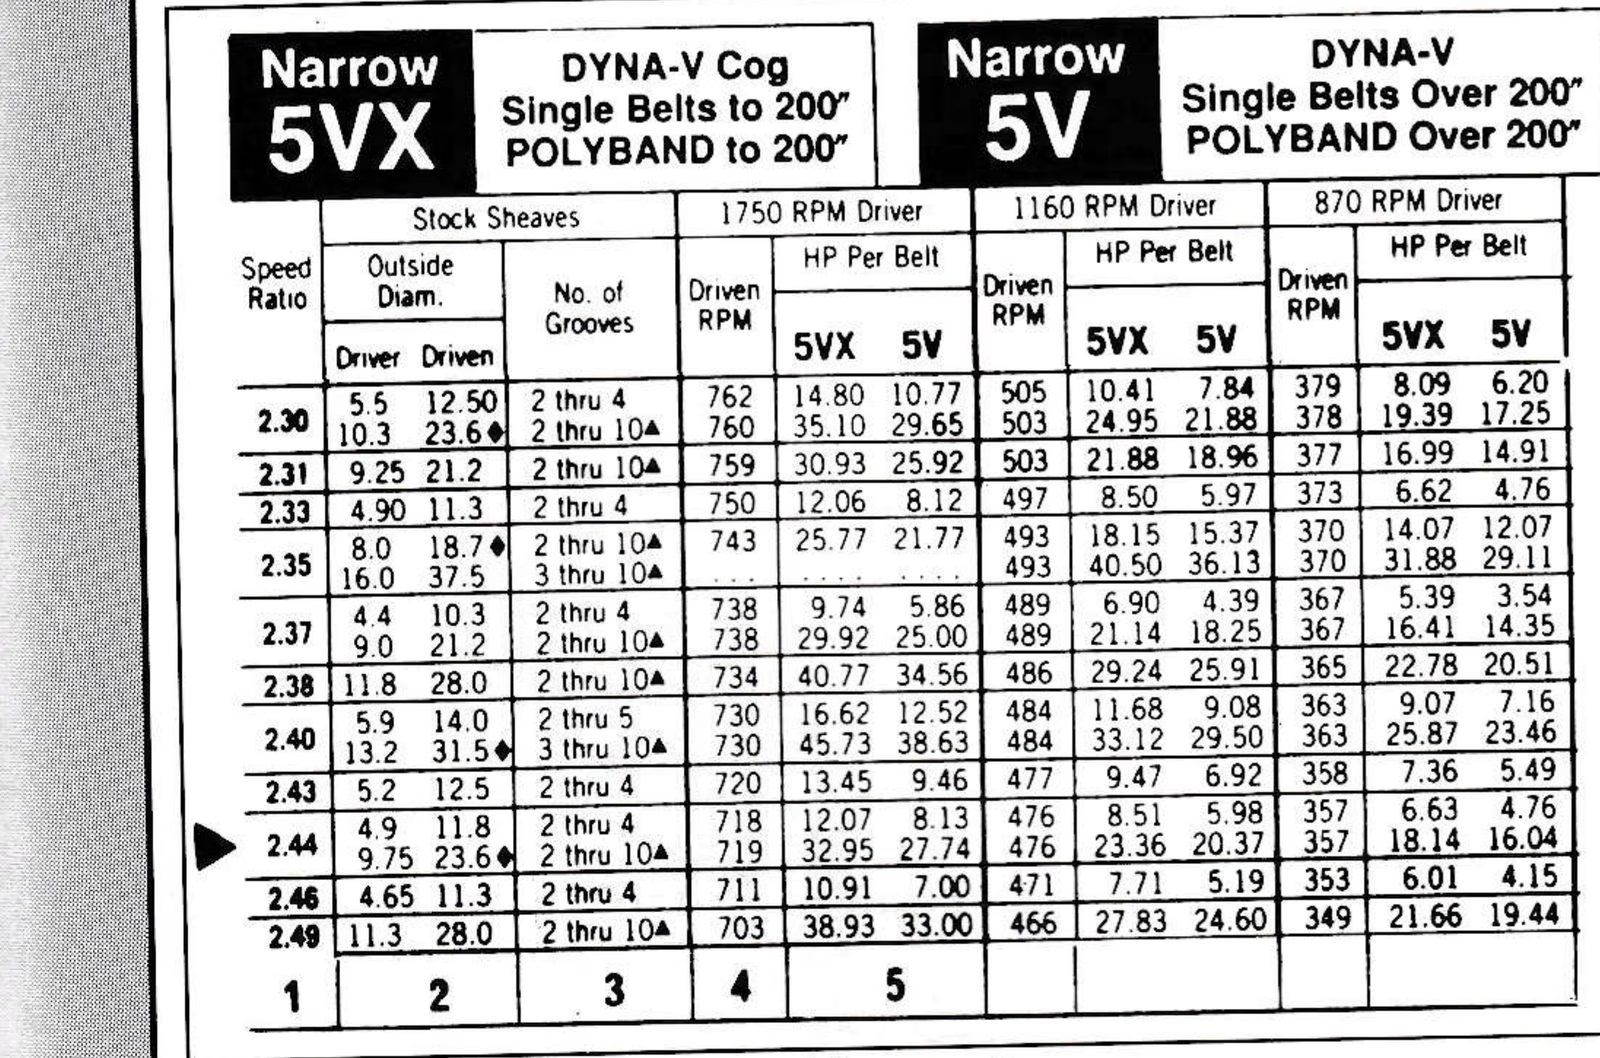
Now refer to Figure #4 (Table 6) below. Along the bottom, choose the Design Horsepower of 120. Follow that imaginary line up to where it intersects the 1,750 rpm line and select the narrow belt section 5V. With the belt section and drive ratio selected, the drive and driven sheaves can be determined from Figure #5. In the very left-hand column, find a “Speed Ratio” of 2.44. There are two possibilities. Let’s choose the smaller sheaves since they most likely will be less expensive. Thus, the driver is 4.9 inches and the driven is 11.8 inches. Now skip over to the fourth column for a “1,750 RPM Driver” and verify that the driven shaft speed is 718, which is very close to the 716 calculated. Just to the right of the 718 is the allowable horsepower per belt (for a “standard” belt) of 8.13. Oops! Only four grooves are available for a total horsepower of 32.5 (see column 3). Even the 5VX won’t handle the job—at 48 hp. Selecting the larger sheaves (9.75 X 23.6) should do nicely.

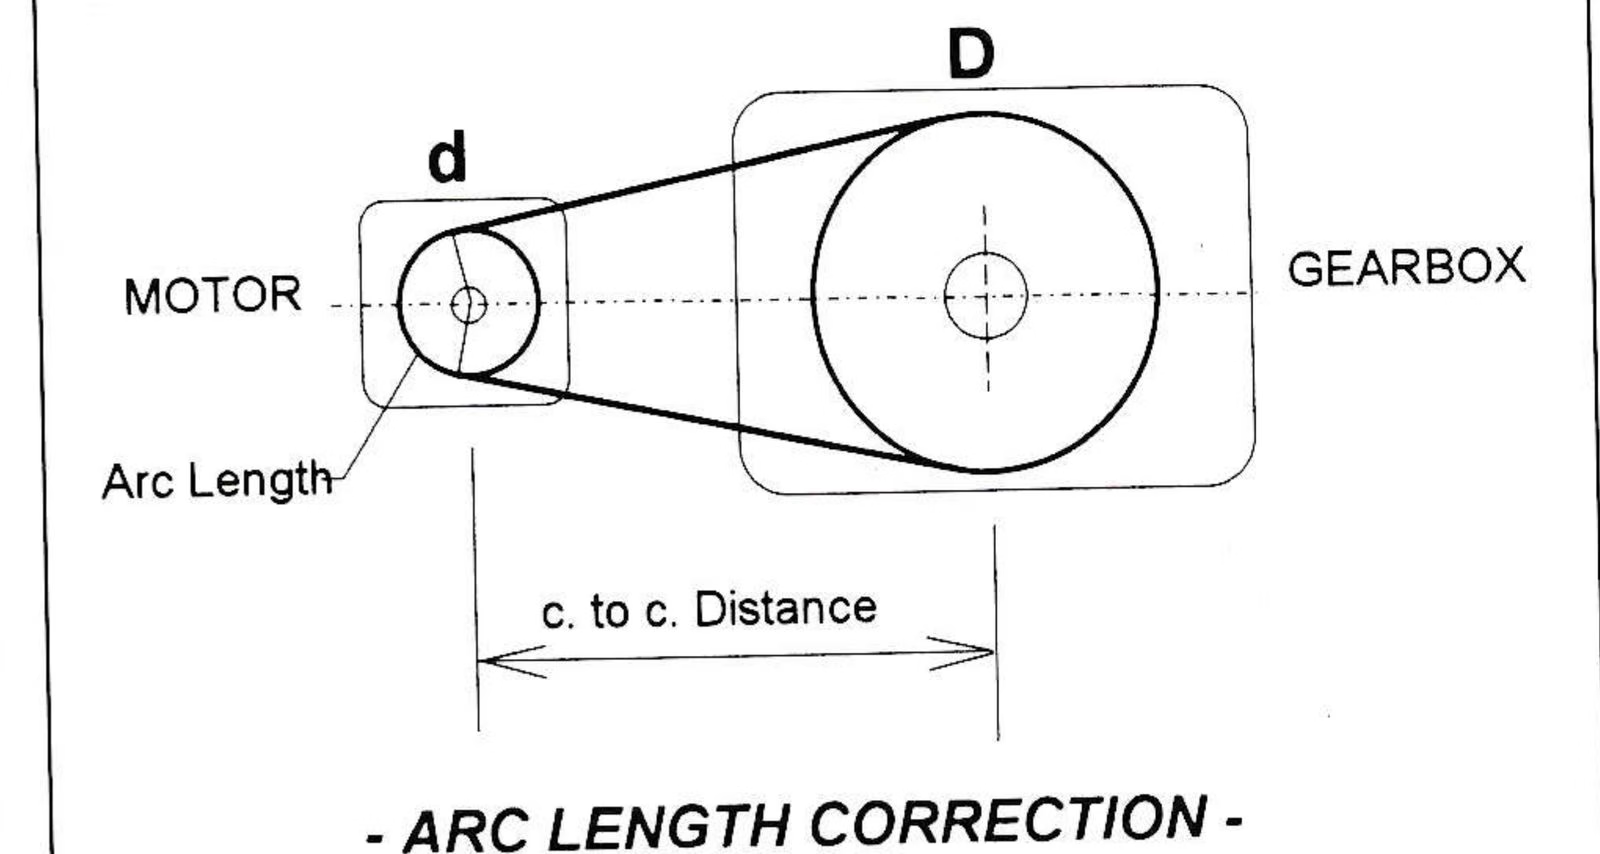
Before making the final selection, we must add some corrections. For a center-to-center distance of 38″ another table (not shown) indicates that the total belt length required is 140 inches for a center distance of 38 inches. An arc length correction factor accounts for more, or less, contact area between the belts and the drive sheave. As the contact area on the drive sheave decreases, so does the allowable horsepower per belt—and by as much as 10 percent. Conversely, horsepower can be increased by up to 15 percent per belt when the sheaves are spaced further apart, thereby increasing contact area. (See below.) In our example, the factor is 1.0, since normal contact is being made.
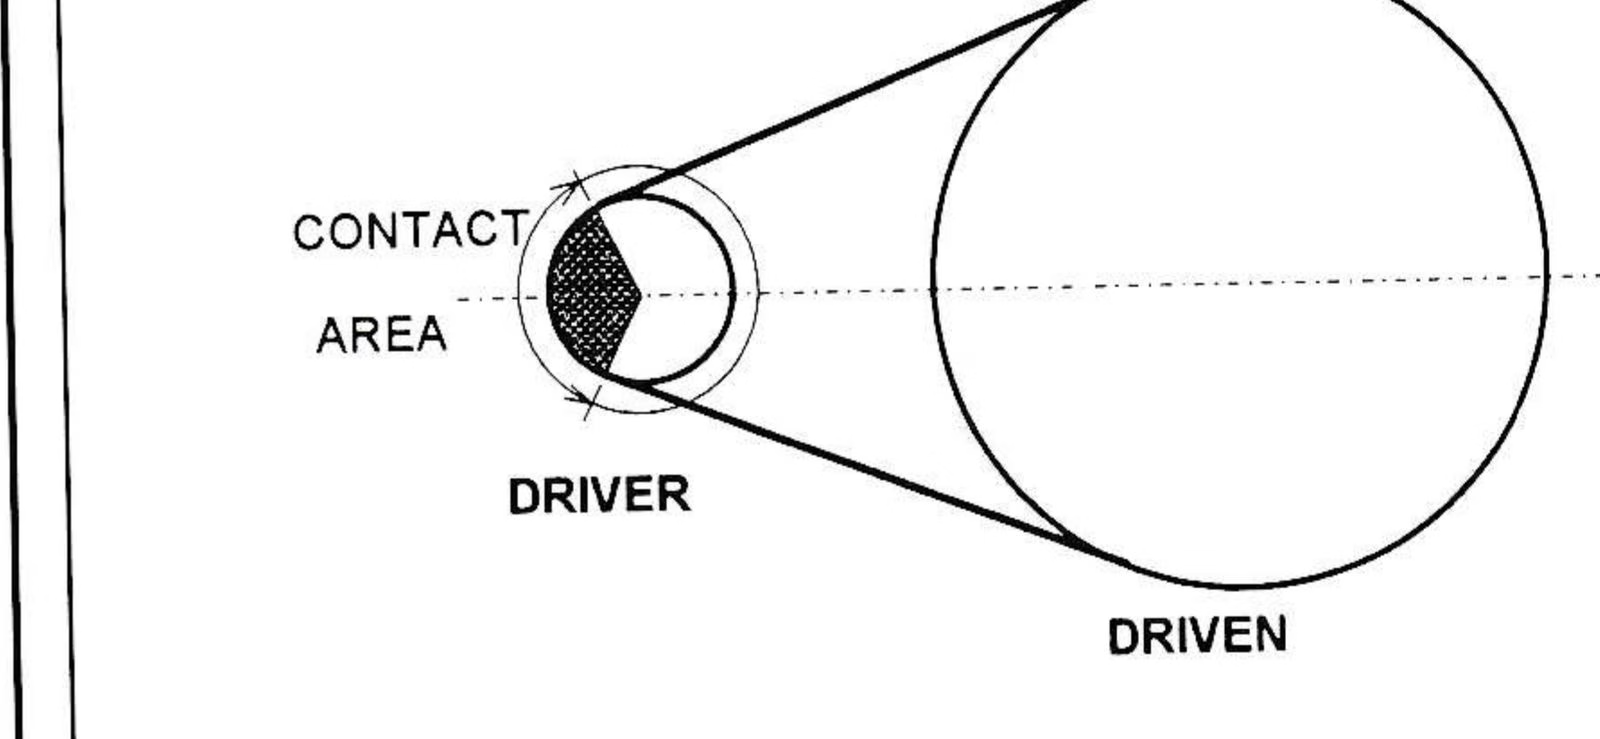
Finally, selecting the number of belts is the easy part. In case you haven’t already figured it out, simply divide the Design Horsepower by the corrected Horsepower per Belt.
No. of Belts = 120/27.74 or 4.3 belts. USE 5:5V 1400 BELTS
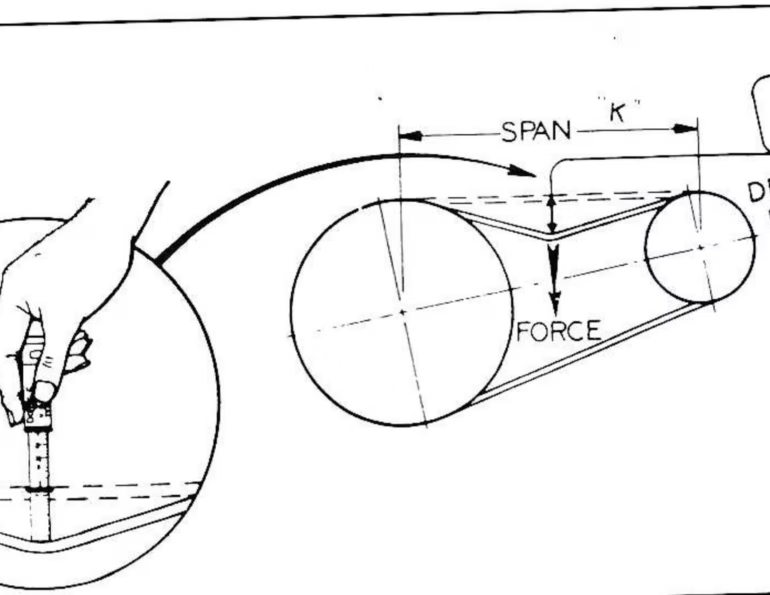
The job isn’t finished until the belts are properly tensioned. Although there are various methods available, for individual belts, use a “V-Belt Tension Tester” that can be purchased inexpensively from your belt supplier.
When the new belts are installed, one national belt manufacturer recommends over-tensioning by 20 percent. The reason being that new belts stretch (just like a new haul rope) and the tension drops rapidly during the first hours of operation. Belt tension checks should be done routinely for the first 50 hours of operation.
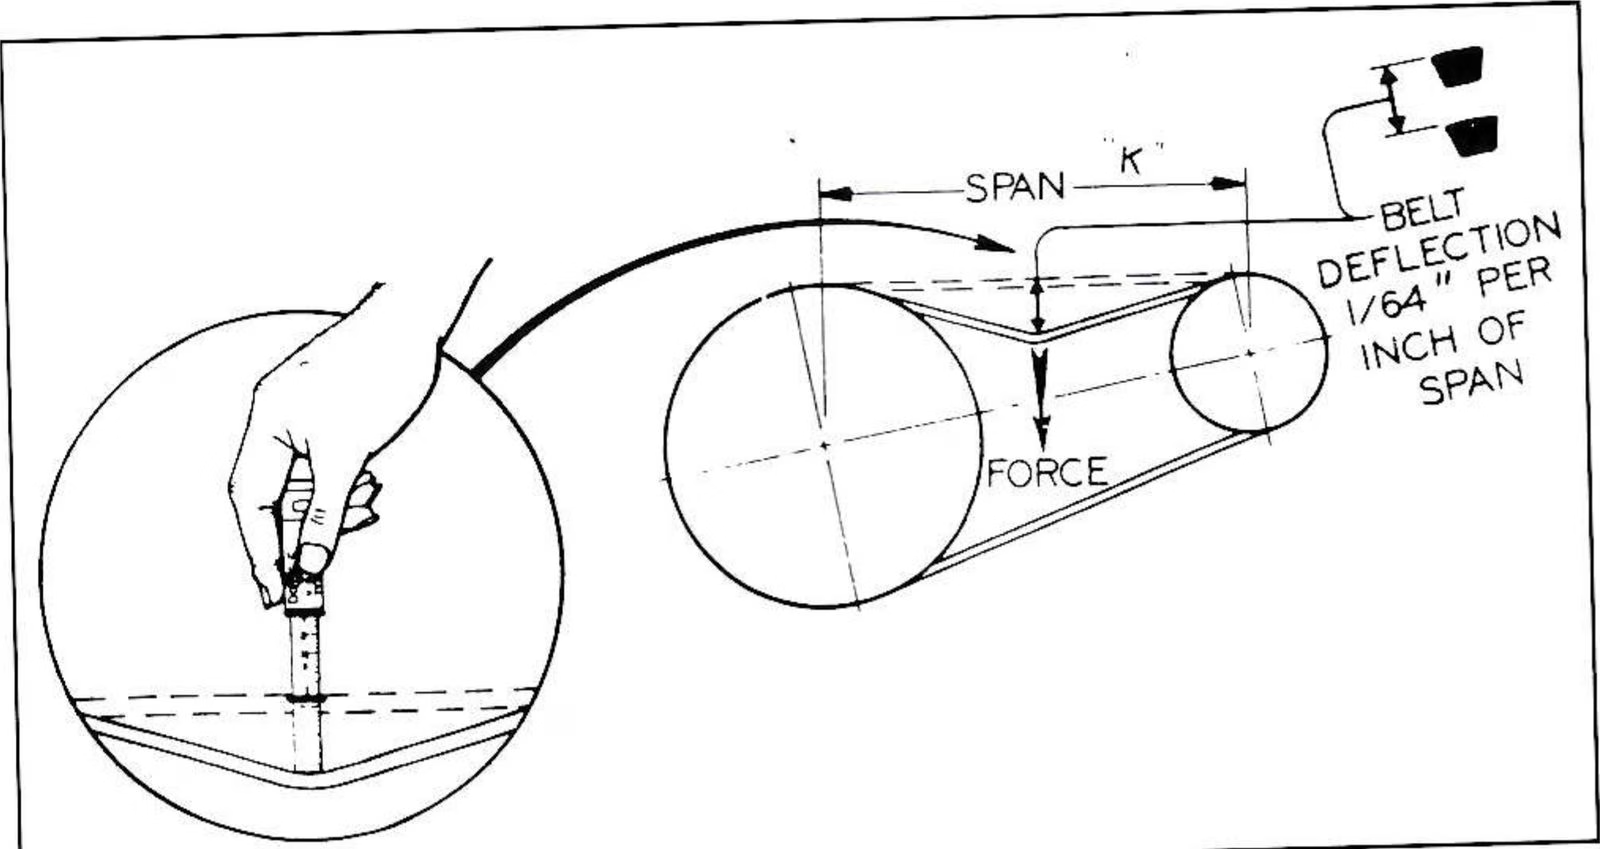
Tensioning band-type belts is not as easy. As one lift designer suggested, the only practical method of tensioning these wide belts is to tighten until they don’t squeal anymore under full load. This method will usually work if the correct number and size of belts are installed, the sheaves are properly aligned and the motor and gearbox bearings will take the additional side loading. If any drive belts squeal, there are four possible reasons: 1) they are loose; 2) the acceleration rate of the drive motor is too fast; 3) the number or size of belts is incorrect; or 4) the belts don’t match the sheaves.
The bottom line: if your drive belts slip, don’t just reach for a can of belt dressing. Determine the real reason before you smoke the only set you have—on Christmas Day, of course.
Tips to Maximize Your Belt Life
by Barry Koons, Lift Maintenance Supervisor, Camelback Ski Area, Pa.
- Check alignment of the drive and driven sheaves using a steel straightedge along the faces of the sheaves. Don’t trust your eyes only!
- Never use belt dressing on V-belts.
- If any larger diameter sheaves (say, 15-in. or greater) are used, they may need to be dynamically balanced to prevent undue vibration, which reduces both belt and bearing life.
- Under-tensioning may cause belt slippage, but over-tensioning may cause bearing failure in both the motor and gearbox, as well as shortened belt life.
- More belts aren’t always better. Proper tensioning of extra belts may overload motor and gearbox bearings.
- Belts should be kept free of oil, and protected from sunlight whenever possible. Grease and oil can be removed by carbon tetrachloride (CCl4).